How to Control Visibility of Reify Fields

We’ve all had the problem when building applications, where we only want certain things to be shown and editable when conditions are right.
Reify has just made this simple, with it’s intuitive and powerful interface for field level management.
By using the EnableWhen and VisibleWhen properties, you can easily control what gets shown, when it gets shown and when it can be changed.
To do this, we are going to create a little application to demonstrate how easy this is to do.
Firstly, we are going to import a DataSource. Importing DataSources in Reify is easy, with all of the hard work taken out of the process for you.
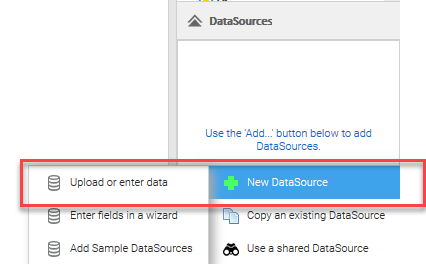
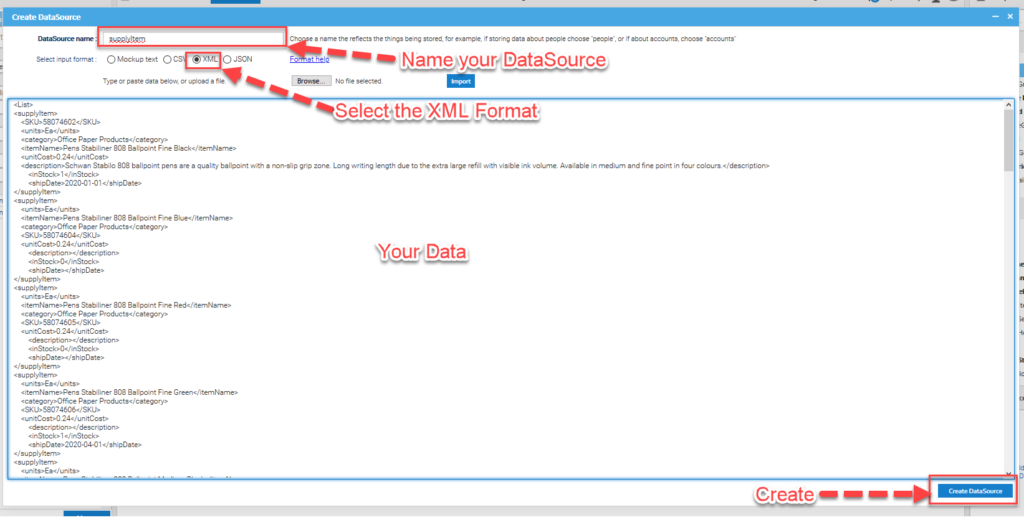
Access the DataSource Management suite by selecting Add -> New DataSource -> Upload or Enter Data in the bottom right hand corner of the Reify screen.
From the resulting screen, give your DataSource a name (we suggest supplyItems), select XML as the format, copy and paste the XML formatted data shown below into the main body of the screen and click Create.
<List>
<supplyItem>
<SKU>58074602</SKU>
<units>Ea</units>
<category>Office Paper Products</category>
<itemName>Pens Stabiliner 808 Ballpoint Fine Black</itemName>
<unitCost>0.24</unitCost>
<description>Schwan Stabilo 808 ballpoint pens are a quality ballpoint with a non-slip grip zone. Long writing length due to the extra large re-fill with visible ink volume. Available in medium and fine point in four colours.</description>
<inStock>1</inStock>
<shipDate>2020-01-01</shipDate>
</supplyItem>
<supplyItem>
<SKU>58074604</SKU>
<units>Ea</units>
<category>Office Paper Products</category>
<itemName>Pens Stabiliner 808 Ballpoint Fine Blue</itemName>
<unitCost>0.24</unitCost>
<description></description>
<inStock>0</inStock>
<shipDate></shipDate>
</supplyItem>
<supplyItem>
<SKU>58074605</SKU>
<units>Ea</units>
<category>Office Paper Products</category>
<itemName>Pens Stabiliner 808 Ballpoint Fine Red</itemName>
<unitCost>0.24</unitCost>
<description></description>
<inStock>0</inStock>
<shipDate></shipDate>
</supplyItem>
<supplyItem>
<SKU>58074606</SKU>
<units>Ea</units>
<category>Office Paper Products</category>
<itemName>Pens Stabiliner 808 Ballpoint Fine Green</itemName>
<unitCost>0.24</unitCost>
<description></description>
<inStock>1</inStock>
<shipDate>2020-04-01</shipDate>
</supplyItem>
<supplyItem>
<SKU>58119902</SKU>
<units>Ea</units>
<category>Office Paper Products</category>
<itemName>Pens Stabiliner 808 Ballpoint Medium Black</itemName>
<unitCost>0.24</unitCost>
<description></description>
<inStock>0</inStock>
<shipDate></shipDate>
</supplyItem>
<supplyItem>
<SKU>57725500</SKU>
<units>Ea</units>
<category>Office Paper Products</category>
<itemName>Post-it Instruction Pad Stop Press Ref Ps10</itemName>
<unitCost>2.83</unitCost>
<description></description>
<inStock>0</inStock>
<shipDate></shipDate>
</supplyItem>
<supplyItem>
<SKU>57726600</SKU>
<units>Ea</units>
<category>Office Paper Products</category>
<itemName>Post-it Instruction Pad Final Notice Ref Pn11</itemName>
<unitCost>2.83</unitCost>
<description></description>
<inStock>0</inStock>
<shipDate></shipDate>
</supplyItem>
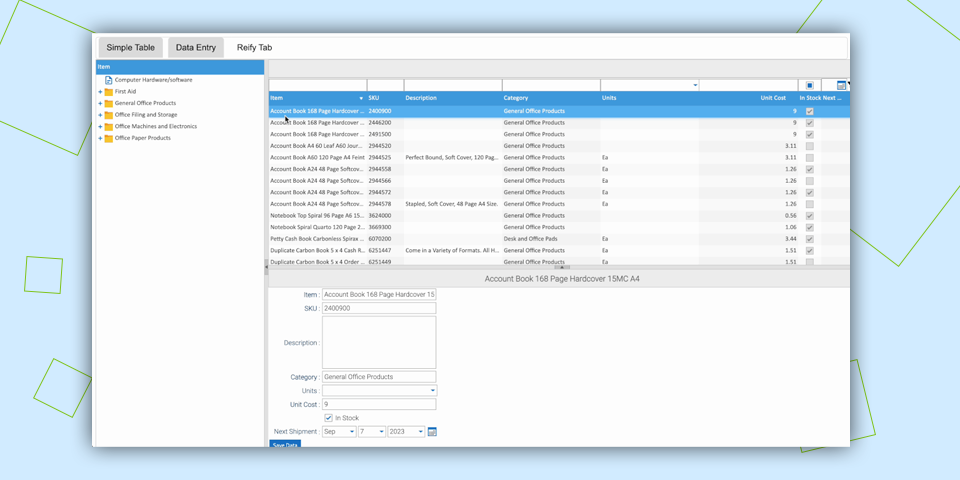
</List>Code language: HTML, XML (xml)Add a ListGrid (supplyItemGrid) and Table Layout Form (supplyItemForm) and bind them both to the supplyItem DataSource.
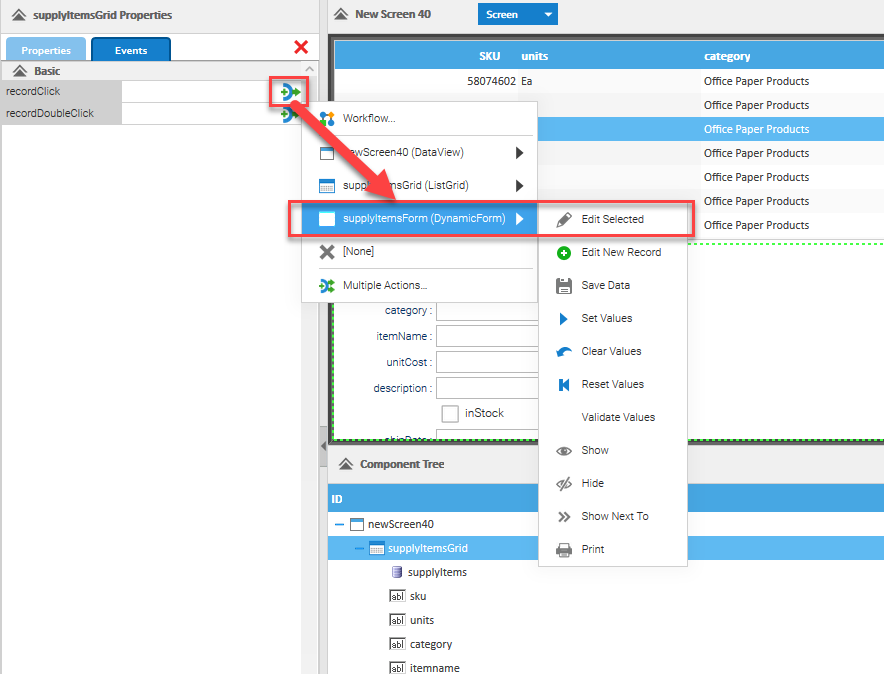
- On supplyItemGrid, select the Events tab in the left-hand Properties section. On the recordClick event, select supplyItemForm-> editSelected.
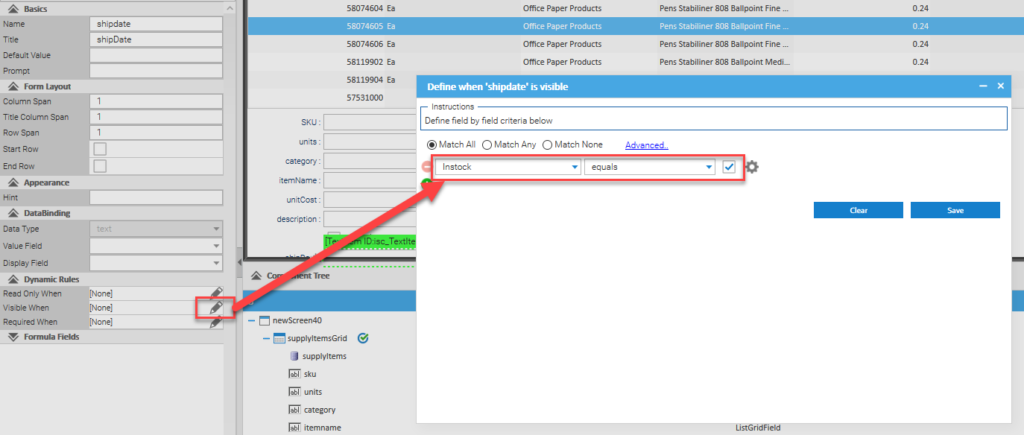
- Click on the shipDate Field in the supplyItemForm, locate the VisibleWhen property (use the filter to easily find the relevant property) and click the edit Icon. From the available entries, select supplyItemForm.inStock equals true.
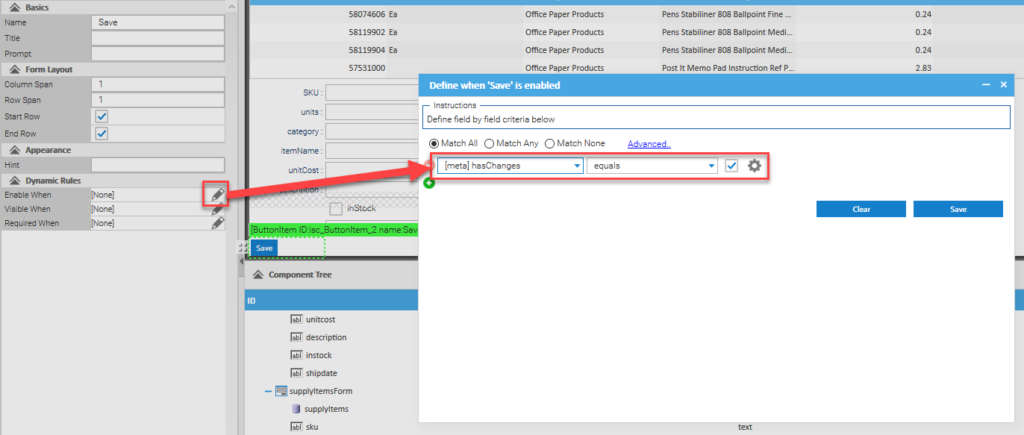
- Add a ButtonItem below the last field in the supplyItemForm and call it “Save”.
- Click on the ButtonItem, locate the EnableWhen property and edit it. From the available options, select supplyItemForm.[meta].hasChanges equals true.
- Click Run.
When this is run, selecting a record from the grid populates the form, but the Save button is currently disabled. Click the “in Stock” checkbox to see the Ship Date appear. Then change a value, and see the Save button become enabled.
This is just a simple example of the power of EnableWhen and VisibleWhen functionality in Reify. It is possible to have highly complex workflows of events and actions manipulating data and states of fields to give you complete flexibility when designing your screens.
We will regularly be posting more tips and tricks, to improve your knowledge and to get you moving rapidly with using Reify, so stay tuned!!!
Get a demo of Reify
Experience a live demonstration of the Reify low-code platform customized to your specific needs!