Multi-Record Editing In Reify

In this feature focus article, we’ll be diving into the powerful capabilities of multi-record editing in Reify.
For those unfamiliar, multi-record editing, also known as bulk edits, refers to the ability to make changes to multiple records at once, rather than one at a time. This is particularly useful when working with large data sets or when making consistent updates across multiple records.
Whether you’re editing through a grid interface or through separate components, Reify’s multi-record editing feature reduces the number of server calls and eliminates the possibility of conflicting changes being made by different users. With this feature, you can easily make bulk updates and resolve changes with ease. Through the rest of this article, we will showcase just how multi-record editing works on Reify, highlighting its capabilities and benefits.
The complexity of multi-record editing
Multi-record editing can present a complex and performance-draining challenge for web applications. Traditional methods of handling this scenario often involve storing temporary edits on the server, and merging those edits with the original values. This can lead to a complicated mechanism of rendering, with special styling for edited values, and constant communication between the client and server for stored and pending values, and validation rules, among other issues. Additionally, the edits need to be saved as a transaction and there may be challenges with handling colliding edits from other users. If server or SQL storage is used, there is also the added task of cleaning up that storage.
At Reify, we have developed a better solution to handle multi-record editing. Our approach utilizes a client-side component that can queue up the changes, display them, validate them (including server contact where necessary), and then submit them all as a batch. This eliminates the need for expensive server requests and reduces the amount of code and complexity needed to handle the scenario.
Our team has extensive experience in handling multi-record editing, having first implemented this architectural approach in 2005. We have made the interaction very simple, with all of the necessary settings and override points to handle a wide variety of variations on the base scenario. With our approach, it takes just one property (autoSaveEdits: false) to enable the entire system.
Our approach to multi-record editing is not only efficient and powerful, it’s also user-friendly
How to set up multi-record editing in Reify
In this section, we will showcase how multi-record editing works in Reify and how easy it is to set it up.
Step 1: Set up your DataSources
We’ll start by creating a copy of the sample “Customer” DataSource. From the DataSource panel, you can upload a new DataSource by clicking “Add” and then selecting “Copy an existing DataSource”.

This will open up a window where you can create your DataSource. In this window, give the DataSource a name that relates to the data you’ll be working with. For this tutorial, we will be saving the DataSource as “CustomerData”.
Step 2: Build your screen
Next, we’ll add a ListGrid to the screen and bind it to the “CustomerData” DataSource. From the properties panel of the customerDataGrid, set “Can Edit” to “True” and then set “Auto Save Edits” to “False” in order to enable the multi-record editing feature.
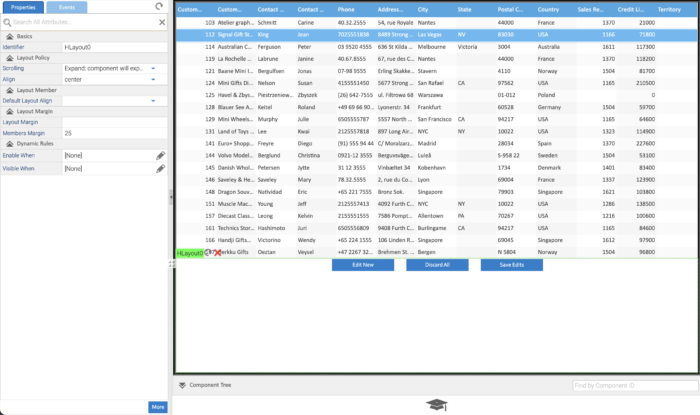
Now, we’ll add an HLayout that will contain three buttons below the ListGrid. From the Component Library, double-click on HLayout to add it to the screen – it will be automatically placed below the customerDataGrid. Set “Align” to “center” and “Members Margin” to “25”. This will ensure that the buttons are aligned in the center of the screen and have a margin of 25 pixels between them.
From the Component Library, add three buttons. Name the 3 buttons “Discard All”, “Edit New”, and “Save All Edits”.
Step 3: Add workflow to save multiple edits at once
First, we will configure the “Save Edits” button. This button is important because it allows you to save all the changes that you have made to multiple customer records at once, without having everything autosaved.
When you make changes to a record in the ListGrid, those changes are tracked as “pending edits” and exist only on the client. The grid automatically keeps them separate from the original records, allowing you to easily see which changes have been made and which haven’t.
To save batch edits in a single transaction, you will need to add a Click Event to the “Save Edits” button. To do this, simply click the button, then go to the Click Event tab and add a “Workflow”. In the workflow editor, select the “Save All Edits” task under “Grid Tasks”.
Below, you can see the screen in action and how the “Save Edits” button and multi-record editing work.
When the “Save Edits” button is clicked, the grid will then submit all the changes as a single HTTP request, which can be transactionally committed – which is the default / automatic if you have the SmartClient server (equivalent to using the default Reify deploy).
Step 4: Add workflow to discard all edits
What if you want to discard all the edits made without saving them?
The “Discard All” button allows you to easily discard all the edits made without saving them, which can come in handy when you need to start over or if you accidentally made changes that you don’t want to keep.
To set up the “Discard All” button, simply add a Click Event to it. Select “Workflow” and then “Discard All Edits”. This action is simple and easy to perform, with just a few clicks you can discard all the changes made.
Just like with the “Save Edits” button, the edits are queued on the client side. The “pending edits” exist only on the client and the grid tracks them and keeps them separate from the original records. This makes discarding the edits just as easy as saving them, as it only returns the records back to their original state.
Step 5: Add workflow to enter a new record
The “Edit New” button will start a new data record row. To do this, we will click on the button, go to the Events tab, and add a Click Event > CustomerData DataSource > Start Editing New.
And that’s it! The multi-record editing feature in Reify is that easy to use!
It’s important to realize just how much power you get, combined with this level of simplicity:
- while editing, your users have access to all the usual grid features: dynamically freezing columns, grouping, filtering & sorting data, etc
- validators are automatically run as needed, and errors displayed for user correction. If validators are declared that require server contact (such as “Is Unique”), the necessary server contact is automatically and transparently handled in the background
- there is no server contact during the entire editing interaction (other than validators that require server involvement), making it extremely scalable
- this approach scales to millions of rows, with no additional code or configuration required
- saving is automatically transactional, so concurrent edits by multiple users are safe
Thousands of concurrent users, millions of rows, powerful UI and extremely simple to set up – perfect!
Get a demo of Reify
Experience a live demonstration of the Reify low-code platform customized to your specific needs!